
You can use this export option when needing to generate Industry Foundation Class (IFC) files from your Revit Project typically when collaborating with other consultants / disciplines who may be working with ArchiCAD software.
Firstly select the required Revit Sheets or Revit Views to be exported from the Xporter main interface and then click the Export button from the ribbon.
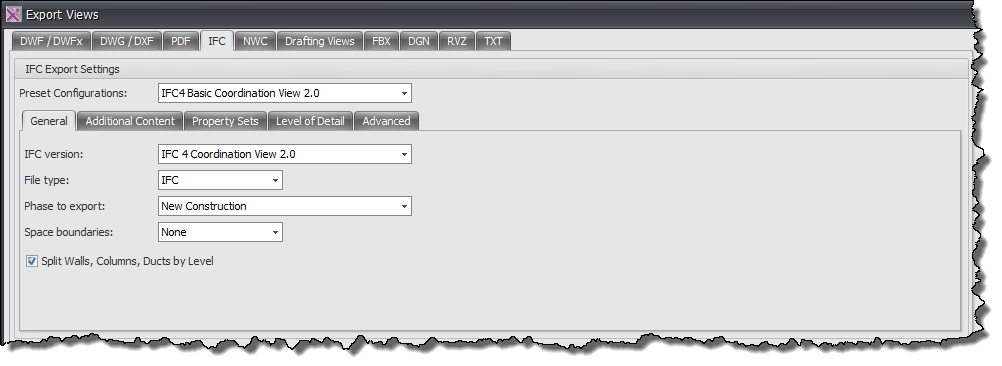
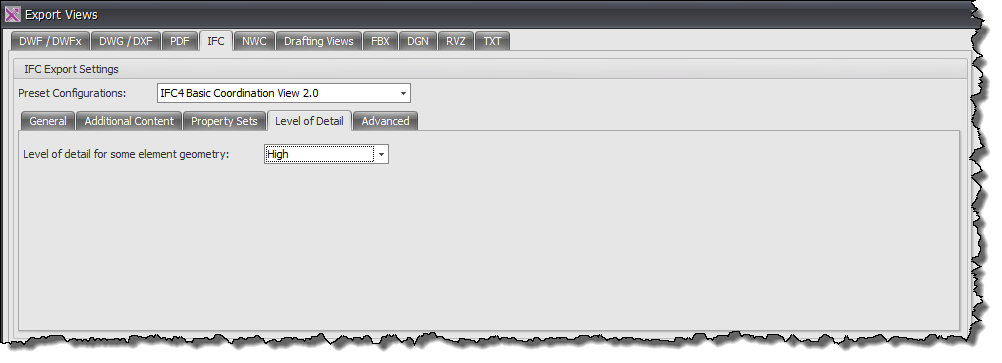
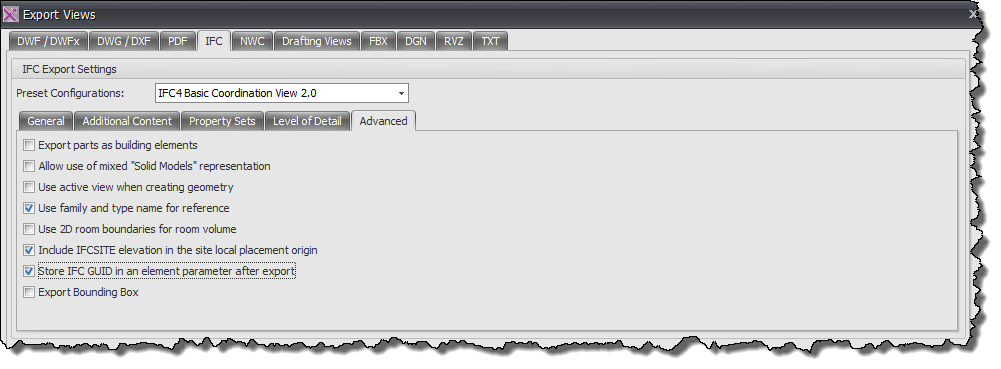
The top half of the Dialog box relates to the ‘Export’ settings and options for the resulting IFC files as shown by the below image. Most of the options emulate those available inherently from Revit itself.
IFC Export Settings
If required you can choose to ‘Split Walls & Columns by Level’ and ‘Export base Quantities’ by checking the boxes. From the Include Space Boundaries Drop down box you can either set to None or choose the appropriate Level from the drop down list. For File Version you can again select the required option from the drop down list.
- Preset Configurations – Select from the drop down list the required IFC export preset.
- IFC Version – Select from the drop down list the required IFC version to be used.
- File Type – Select from the drop down list the required file type (IFC, IFC XML, zipped IFC, zipped IFC XML)
- Phase to Export – Select from the drop down list the project Phase to export (Existing, New Construction)
- Space Boundaries – If you do not want to export Space boundaries select ‘none’ otherwise to export space boundaries select the requited level from the drop down list.
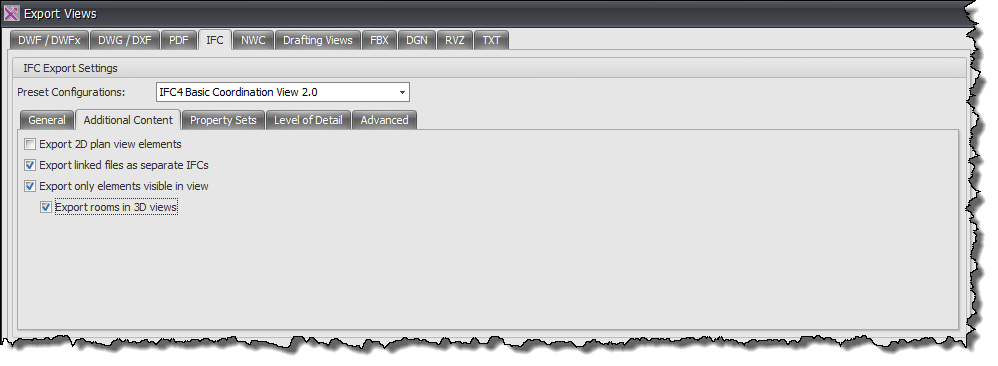
- General Tab – select as required any additional settings by ticking the checkboxes for elements visible in view, bounding boxes, split walls/columns, 2D plan elements or linked files.
- Additional Content Tab – select as required the export settings for additional content by ticking the checkboxes
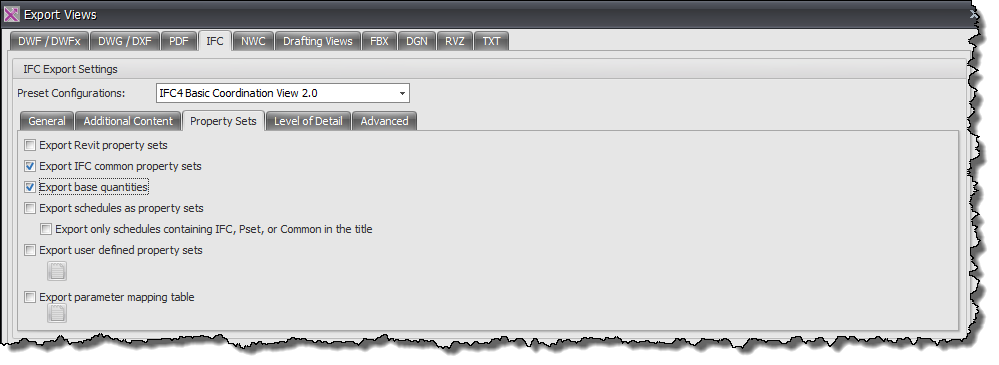
- Property Sets Tab – select as required any additional settings by ticking the checkboxes for Property sets, schedules, base quantities etc. Click the button if required to load a user defined property set.
- Level of Detail Tab – select the required level of detail to be used for export from the drop down list.
- Advanced Tab – select as required any additional settings by ticking the checkboxes for Level of geometry detail, parts, Family/type name references, 2D room boundaries, IFC SITE elevation, IFC GUID etc.
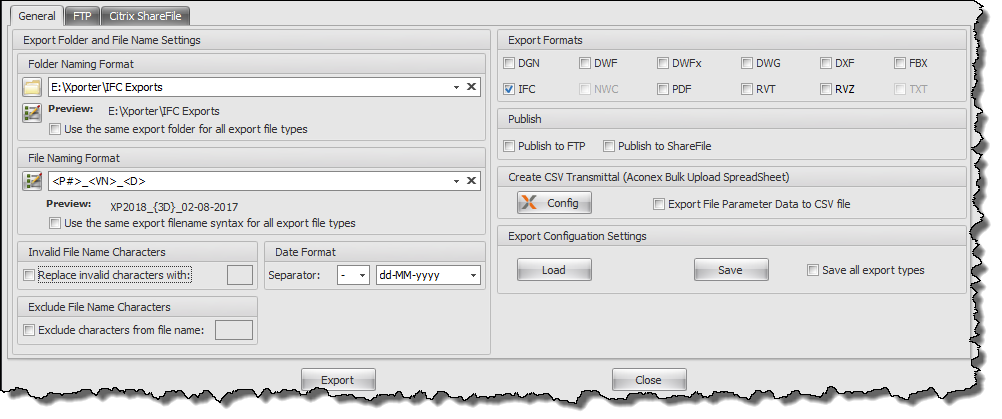
The lower portion of the Dialog box determines the File naming, export location file format settings and file upload settings for the exported files as shown by below example.
General Tab
- Folder Name Settings panel – provide the means to define your Export folder output location and naming convention. Use the Format codes list to create the desired combination for the folder name or use the browse button to navigate to an existing folder location. If you want to use the same output folder for all file types then tick the checkbox below.
- File Naming Format – provide the means to determine your file naming convention. Use the Format codes list to create the desired combination for the file name template (a sample preview is given as a guide). If you want to use the same file naming syntax for all file format types then tick the checkbox below.
- Date Format – Use the date format options to select the required date format and date separator.
- Export Formats Panel – is where you select the required output formats by checking the required boxes
- Invalid Characters – if your file naming involves invalid characters tick the box for Xporter Pro to check and it will replace with the value entered such as a hyphen, dot, or underscore.
- Publish Panel – if you want the resulting exported files to be automatically uploaded to an FTP or FileShare site then tick the box and configure the FTP settings on the FTP tab etc.
- Create CSV Transmittal panel – provides the means to generate a CSV file to be used for aconex uploads. Click the Config button to configure which Revit parameters you want to use as Export parameters / columns in the resulting CSV file. Note that Xporter Pro will not actually perform the aconex upload.
- Export Configuration Settings panel – provides the means for you to save your selected export configuration settings to an .xml including folder and file naming conventions so that you can load the .xml file back again at a later date with all the settings.
FTP Tab
To find out more about the FTP tab for automatic uploads click here
Citrix ShareFile Tab
To find out more about the Citrix ShareFile tab for automatic uploads click here