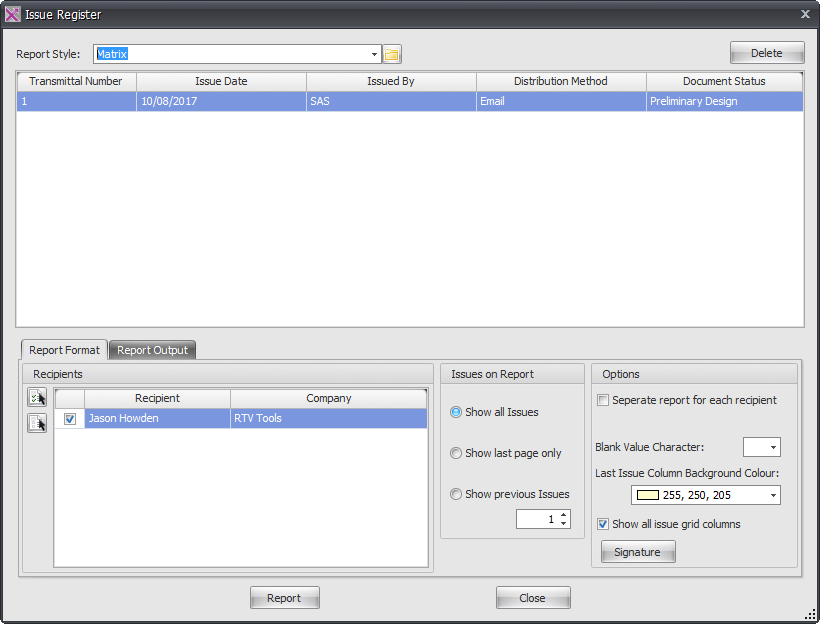
Once an Issue has been generated it will then be listed under the Issues Register dialog box which displays a full list of all issues stored in the Xporter Pro SQL Database outside of Revit.
From here you select the required Transmittal Number in order to then generate an actual Report in PDF format that can of course accompany the actual issue media/ Drawings to the intended recipients.
The Top section of the Issue Register dialog box displays the list of Transmittals as a historical record. the lower portion of the dialog box is split between two tabs – Report Format and Report Output.
Report Format Tab
Recipients window will display a list of all recipients setup under the Issue Settings dialog box. If the checkbox is ticked next to a recipient then they will be displayed on the resulting report.
![]() Clicking the Select All Recipients Icon will actively select all listed recipients in adjacent window for the report.
Clicking the Select All Recipients Icon will actively select all listed recipients in adjacent window for the report.
![]() Clicking the Clear All Recipients icon will clear All recipients listed in the adjacent window for the report. Note that you must have at least one recipient selected to generate a report.
Clicking the Clear All Recipients icon will clear All recipients listed in the adjacent window for the report. Note that you must have at least one recipient selected to generate a report.
Show All Issues: Will display a full history of all issues on the resulting Report
Show Last Page only: If you have generated multiple issues to the point they flow over onto more than one page then selected this option will only generate a report showing the last page of Issues being the most recent.
Show Previous issues: by selecting this option you can manually define how many previous issues you want to display on the resulting Report in addition to the current issue.
Separate report for each recipient: By ticking the checkbox for this option it will generate separate reports for each of the active recipients instead of one report displaying all the recipients on it. This option is useful for confidentiality when issuing Tender documentation to competing contractors so that you don’t give away who they are competing against by displaying the other ‘tenderers’ on the same single report.
Blank Value Character: from the drop down list select either none (default), * or –
Last Issue Column Background Colour: From the Drop down list you can define a background colour to be used in order to graphically highlight the current issue column on resulting report.
Show all issue grid columns: determines whether grid lines on resulting report are either displayed or not displayed.
Signature: click the button in order to browse and define a Signature Image file to be used with the Issue Report.
Report Output Tab
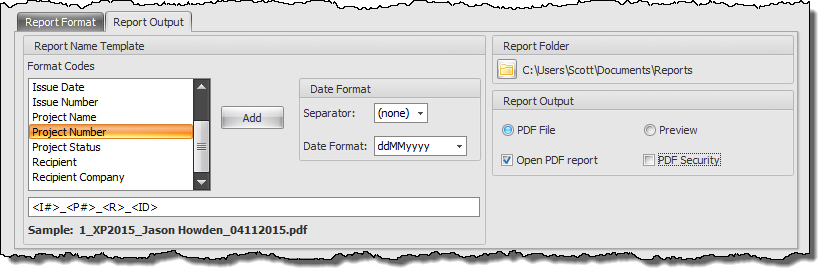
Select the required parameter format codes to define your parametric file naming convention for the Reports generated by either double clicking on the parameter name in the left hand window or by highlighting a parameter Name and then clicking the Add button.
set the required Date Format and Separator as required.
Define the Report output folder where PDF report files will be created by clicking the browse button.
PDF File: Selecting this option (recommended) will actually generate the PDF report document in the output folder defined above.
Preview: selecting this option will only give you a preview of the Report in a separate window but will not actually save or generate the PDF document unless you do so from the Preview window itself.
Open PDF report: ticking the checkbox will open the resulting PDF document once created in your default PDF viewer programme.
PDF Security: enabling this option will allow you to implement PDF security options when creating the PDF report.