
You can use this export option when needing to generate Autodesk DWF/DWFx files from your Revit Project for eMarkup’s.
Firstly select the required Revit Sheets or Revit Views to be exported from the main interface and then click the Export button from the ribbon.

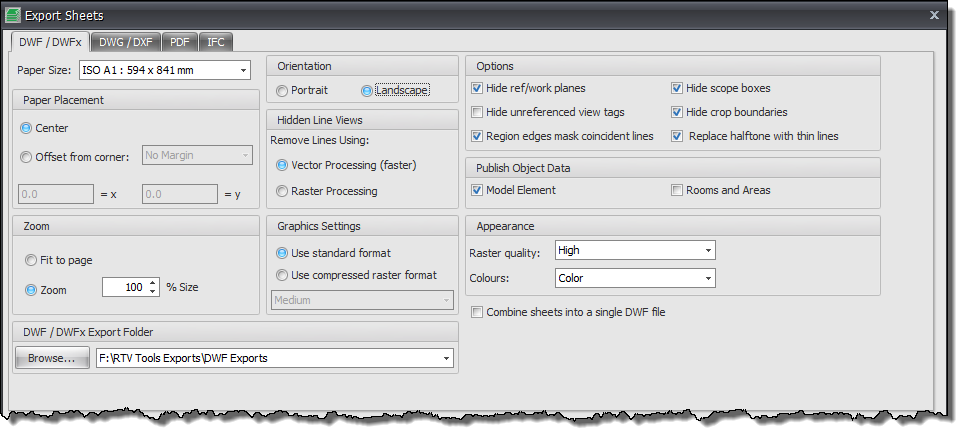
The top half of the Dialog box relates to the ‘Print’ settings and options for the resulting DWF files as shown by the below image. Most of the options emulate those available inherently from Revit itself.
- Paper Placement Panel simply controls the image position on the sheet
- Orientation Panel determines the plot s either Landscape or Portrait orientation
- Hidden Line Views Panel determines the Print mode as with Revit. For linework drawings use the Vector Processing option as it is faster however for drawings containing images or Shaded view mode you may need to use the Raster option.
- Options Panel allows you to choose by use of the check boxes to exclude or include specific content from the resulting print.
- Publish Object Data Panel again provides the option to either include or exclude object data for Model Elements, Rooms and Areas when publishing to DWF.
- Zoom Panel allows you to either print to a specific scale factor or scale print to suit paper size if scale is not important* Graphics Settings Panel gives options to print using standard format or use a compression ratio for Raster printing (Low, Medium, High)
- Appearance Panel lets you choose the Raster quality from the drop down (Low, Medium, High, or Presentation). Also whether you want to print linework in colour, greyscale or Black & White from the drop down options.
- Export Folder: if you want your DWF exported files to go to their own separate folder then click the browse button to define the output folder.
- Combine Sheets – If you want to combine multiple drawing sheets into one DWF file then check the box to ‘Combine sheets into a single DWF file’, otherwise if left unchecked you will get individual DWF files for each sheet
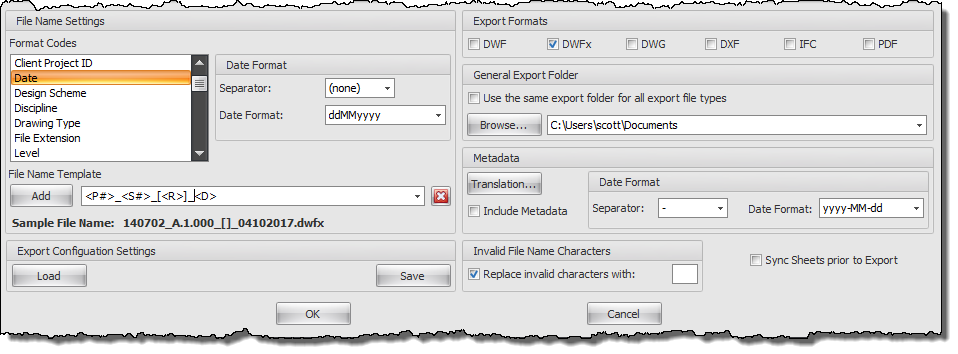
The lower portion of the Dialog box determines the File naming, export location and file format settings for the exported files as shown by below example.
- The File Name Settings panel – provide the means to determine your file naming convention. Use the Format codes list to create the desired combination for the file name template (a sample preview is given as a guide).
- Date Format – Use the date format options to select the required date format and date separator.
- Export Formats Panel – is where you select the required output formats by checking the required boxes
- General Export Folder – can be selected if you want to export all your various export formats to the same location by ticking the box and selecting the export folder. If you prefer to export each different file type to a separate folder then leave this box un-ticked and use the alternative DWG export folder above instead.
- Metadata: an optional feature that will export out any User Meta Data values defined from the User Meta Data tab of the Drawing Manager Config dialog box to generate a .xml file that may then be used by other applications if required.
- Sync Sheets Prior to Exporting: if enabled will perform a Sync to your Revit project prior to exporting the selected sheets/views.
- Export Configuration Settings panel – provides the means for you to save your selected export configuration settings to an .xml including folder and file naming conventions so that you can load the .xml file back again at a later date with all the settings.
Category: Drawing Manager