Configuring the Drawing Number setup and formatting is something you will need to do up front prior to synchronizing with your project as this is what will be used in conjunction with the drawing number on your Sheet Titleblocks.
If importing existing sheets from your Revit Project into Drawing Manager then again you will need to first of all configure the Drawing number formatting to match the format in your Revit project in order for the Drawing Number to display correctly when imported into Drawing Manager.
With Drawing Manager you can effectively cater for virtually any number sequence or format required no matter how complex it may be for larger projects by utilizing any or all of the available Prefix and Suffix columns in Drawing Manger.
You can also setup predetermined look-up values for each Prefix / Suffix column that the user must select from which can provide conformity and consistency in your documentation and numbering formats.
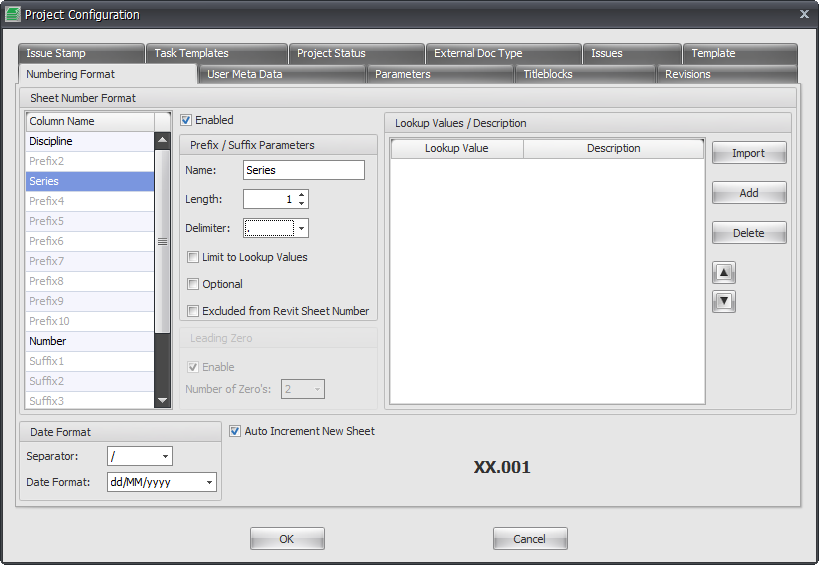
To configure the numbering format go to the Project Settings Tab and then click the Config button to launch the Project Configuration dialog box then go to the Numbering Format tab.
You can select any number and order of Prefix’s or Suffix’s that you wish to use in building up your Sheet numbering format by selecting each one and ticking the Enabled checkbox. You can leave out prefix/suffix columns if you wish so that you have the ability to enable a Prefix that occurs between others where required for a more elaborate numbering system should a particular project demand it.
Each Prefix or Suffix that you enable will equate to a column in the Drawing Manager main data grid which you can rename by typing the required Column Header name in the Name field for each Prefix / Suffix.
The only column you cannot ‘disable’ is the Number column as that is a mandatory required column to generate a Sheet number regardless of any other Prefix’s or Suffix’s.
Prefix / Suffix Parameters Panel:
Name: you can type whatever you like in this field to be used as the Column header in the main data grid for the specific Prefix/Suffix that has been enabled.
Length: set the number of characters allowable for selected prefix/suffix (min of 1 character when enabled)
Delimiter: select from one of the available drop down options to specify a delimiter (separator) to be used between prefix/suffix columns if required or set to none.
Limit to lookup values: if selected will limit the end user to choosing one of the predetermined lookup values from the adjacent window only. If unselected the end user can choose to use one of the pre-determined lookup values listed if they want to otherwise they can enter their own custom value up to the number of characters set for that particular prefix/suffix.
Optional:
Exclude from Revit Sheet Number: if selected then the Prefix/suffix column will appear in the Drawing manager main data grid as a column that can be used but will not be synchronised or used in your actual Revit Sheet Number in your Revit project.
Lookup Values / Description Panel:
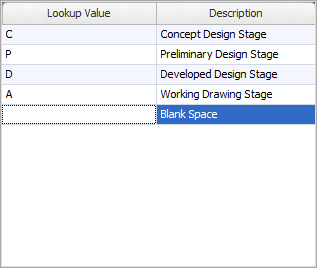
For each of the enabled Prefix’s/Suffix’s you can enter a list of pre-determined lookup values from which the end user can select from in order to build up the Sheet Number Format used with your Revit Sheets.
This can help provide consistency with company standards and protocols when implemented. By ticking the box for each prefix/suffix to ‘limit to lookup values’ it will force the end user to select from a drop down list which will display the options entered here including a ‘blank’ value as a valid lookup option to select if required and prevent them from being able to manually enter their own values.
You can Add as many lookup values as you like, delete unwanted lookup values and re-order them using the up / down arrows as required.
Leading Zero Panel:
This panel is only active when the Number column is selected as it is not applicable to any of the prefix/suffix options. If you want to allow leading zero’s in front of the actual number value then tick the checkbox and set the number of zero’s to be used. You will see the dynamic preview instantly change below.
Date Format Panel:
This date format panel will define the formatting to be used for certain Revit parameters such as Drawn By Date, Checked By Date, designed by Date, Approved by Date etc that will appear on your Revit Sheets. This is not to be confused with the date format for Revisions as that is controlled separately from the titleblock settings dialog box.


