Xporter Pro also includes a File Upgrade Utility that can be used to upgrade not only family files, but also actual project files and template files. You can also incorporate a Prefix/Suffix as part of the new File name if desired.
When upgrading Revit Project files you will also have options to account for Auditing files, Compacting files, Detach from central, open all Worksets, relinquish worksets, set maximum number of backups etc.
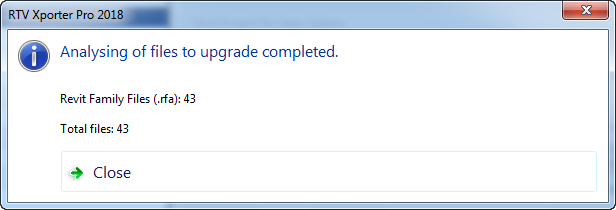
In addition to this you can Analyse a directory to ascertain the number of files contained in that directory which will be upgraded, and also once completed a Log file will be automatically generated that will capture any files that were not able to be upgraded and skipped as a result.
The default location for these log files will be:
C:\Users\userprofile\AppData\Roaming\RTV Tools\Xporter Pro 2016\R1.0\enu\File Upgrader Logs
To use the File Upgrader function of Xporter Pro click the Upgrade Files button from the Ribbon

- Upgrade files in folder: if selected will upgrade the files contained in the Source Folder defined below
- Upgrade files in selection list: if selected will enable the Select files button below to define files for upgrade
- Source Folder: click the Browse button to define the Source folder containing the Revit files to be upgraded
- Analyse Files: click the button to analyse the contents of the source folder defined adjacent prior to upgrade
- Include sub folders: select this option if you want to include any files and sub folders below the main (parent) folder defined in above window
- Select Files: browse for specific Revit files only to be upgraded instead of the entire directory
Destination File Options Panel
- Set destination as Source location: if selected will set the destination folder to be the same as the Source folder defined above
- Replace existing destination file: when selected if a file of the same name already exists in the destination folder then it will be overwritten
- Destination Folder: if you want to put upgraded Revit files into a separate directory then click the Browse button and define the new folder location for upgraded files. Note that if you do not define a Destination folder then the original source files will be upgraded and overwritten as a result
- File Prefix: enter a value if required to use as a Prifix for resulting upgraded Revit files in the destination directory
- File Suffix: enter a value if required to use as a Suffix for resulting upgraded Revit files in the destination directory
File Options Panel
From the File Options panel select the required option(s) for Revit File types to be upgraded from the following;
- Revit Project Files (.rvt)
- Revit Project Template files (.rte)
- Revit Family Files (.rfa)
- Revit Family Template files (.rft)
Note: the Project File portions of the Dialog box will only become active if you select the Revit Project file option to be upgraded.
Revit Project File Open Options Panel
When upgrading Revit Project files you can select from the following option when opening the file prior to upgrading;
- Audit: if selected will perform the standard Revit Audit option on opening the file prior to upgrading and saving
- Detach from Central and Preserve Worksets: if selected will detach from the current Revit Central file and preserve User Created worksets prior to upgrading and saving
- Open All worksets: if selected will Open ALL worksets (user created worksets) prior to upgrading and saving
- Close All worksets: if selected will Close ALL worksets (user created worksets) prior to upgrading and saving
- Current workset state: if selected will preserve the current workset state (user created worksets) prior to upgrading and saving
Revit Project File Save Options Panel
Choose from the following save options when upgrading Revit Project Files;
- Compact file: if selected will perform the standard Revit ‘compact’ option when saving
- Make this a Central model after save: if selected will save the upgraded file as a new Central File
- Relinquish all elements and worksets: if selected will relinquish ownership of ALL elements and worksets
- Relinquish worksets created by the current user: if selected will relinquish ownership of any worksets created by the current user
- Maximum Backups: set value for number of backups as required
- Open Workset defaults: select required option from the drop down list (only available if ‘Make this a Central Model after Save’ is selected)
- View Logs: click the button to view log files generated by performing the File Upgrades.
- Macros: click to define any required macros to execute after the files have been upgraded
- Load: click the button to Load a previously saved .xml configuration file to be used
- Save: click the button to Save the current file upgrade configuration as a .xml file for future use
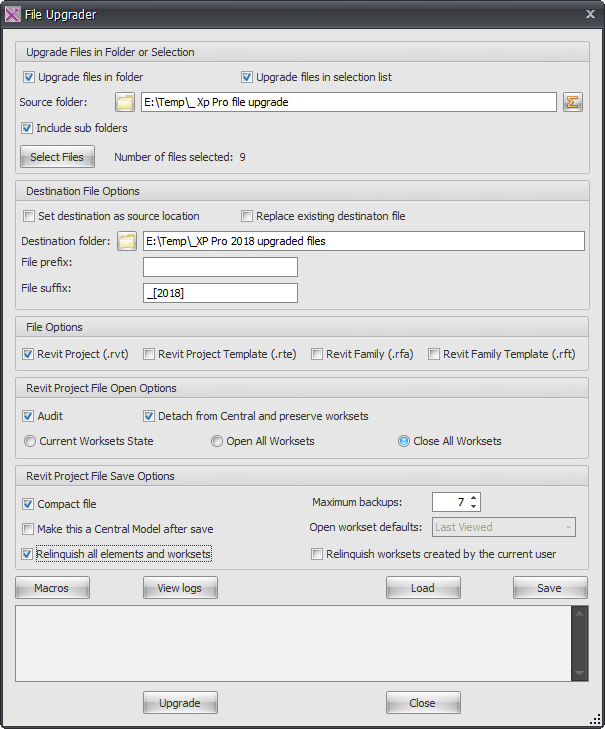
Analyse: clicking the analyse button will query the number of Revit files under the Source Folder location defined to be upgraded
View Logs: click the buttons to view log files generated by performing the File Upgrades.
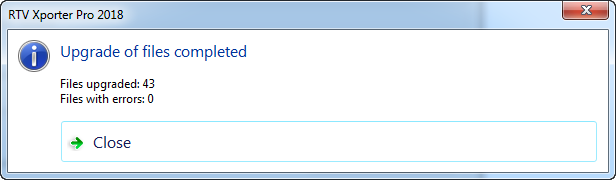
Upgrade: click the button to proceed with the file upgrade based on current settings. A confirmation dialog box will be displayed once task is completed as shown below.