If working with Workset enabled Revit projects when using Xporter Pro to export the Work Sharing Options button will become available to use on the Batch Process panel. Note: for Standalone Revit files this option will be greyed out.
![]()
From the Work Sharing Options dialog box you can select and define the actions required when handling workset enabled project files prior to Exporting when running export configurations using the Task Scheduler.
Central File Workset Options Tab
At the very top of the dialog box you will see displayed the Central File location for the current Revit project file.
Local File Options Panel:
Select the required options for local files from
- Create new local prior to exporting
- Synchronise with central prior to exporting
- Synchronise with central after exporting
- Overwrite existing file
- Append timestamp to existing filename
Local File Path: will only be available if you select the above option to Create new local prior to exporting. Click the browse button and navigate to define the folder location for Local files.
Local File Format Codes: click the button and select from the available list of parameter fields to define your parametric file naming convention.

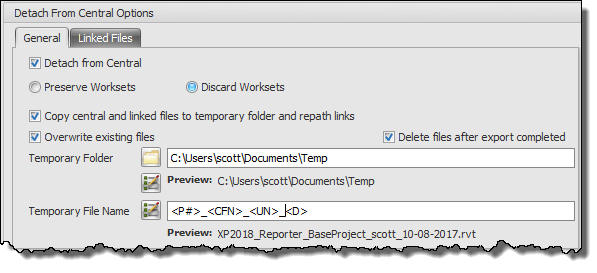
Detach From Central Options Panel:
If you want to ‘Detach from Central’ prior to exporting then tick the Checkbox which will enable the other options available under this panel.
Choose whether you want to ‘Preserve Worksets’ or ‘Discard Worksets’
If you want to Detach and create a copy of your project central file including links to a temporary folder and re-path links ready for Exporting as a Scheduled Task then tick the check box which will enable the remaining options on this panel.
- Overwrite existing files: if selected will overwrite any existing files in the Temporary folder Defined
- Delete Files after export completed: If selected will delete the temporary files created in the Temporary folder once export task has been completed
- Temporary Folder: click the Browse button to define the Temporary Folder on your system to be used for creation and re-pathing of the temporary files
- Temporary File Name: use the Format Code selector options to define a parametric naming convention for both the Temporary Folder name and the Temporary File name
- Date Format: select the required date format option to be used if using the Date Format Code option with Folder or File name above
- Invalid Characters: choose the required option to be used for replacing invalid characters from the drop down list.

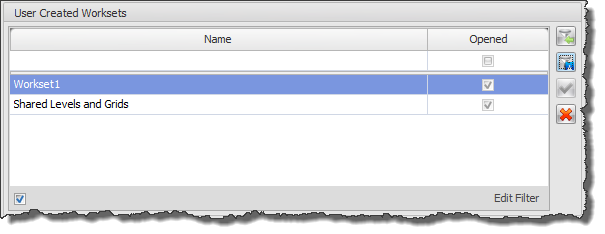
Workset Options Panel:
This section of the dialog box will only be available if you have selected the Preserve Worksets option above otherwise it is greyed out if you Discard wroksets when dettaching.
Choose the required Workset option Setting from the following
- Open All (recommended)
- Last Viewed
- Edited
- Specified (enables the User Created Worksets panel below when selected)
If the ‘Specified’ option is selected the User Created Worksets window will then query and display all of the available User Created Worksets from your current Revit Project File whereby you can then include or exclude specific worksets as a Filter to be used prior to Exporting. You can then also save the Selected Workset Filter configuration as a .xml file that can be loaded and reused for other processes if required.
![]() Load Workset Filter: click to load a previously saved .xml filter configuration for User Created Worksets
Load Workset Filter: click to load a previously saved .xml filter configuration for User Created Worksets
![]() Save Workset Filter: click to save the current Workset Filter for user created worksets configuration as a .xml file
Save Workset Filter: click to save the current Workset Filter for user created worksets configuration as a .xml file
![]() Open Workset: click to set the current selected User Created Workset to Open
Open Workset: click to set the current selected User Created Workset to Open
![]() Close Workset: click to set the current selected User Created Workset to Closed
Close Workset: click to set the current selected User Created Workset to Closed
Central File Archive Options Tab
This tab will provide you with the options for creating archives of your Project Central file Prior to Exporting if required.
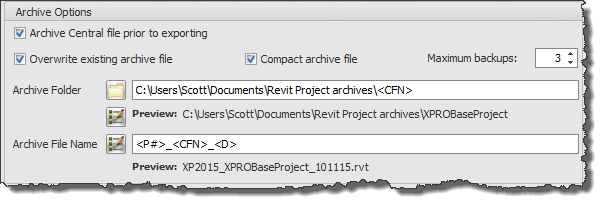
Archive Options Panel:
If you want to create an Archive copy of your Central file prior to Exporting then you must tick the check box which will enable the other options on this panel. You can then choose from the following additional options;
- Overwrite existing archive files: if selected will overwrite an existing Archive files previously created
- Compact archive file: if selected will perform a ‘compact’ when creating Archive file
- Maximum backups: set the number of backups required when creating Archive files.
- Archive Folder: Click the browse button to define the required output folder where Archive files are to be created
- Archive File Name: Either manually enter the desired file name yourself or use the Format Code options available to generate a parametric file naming convention.
Detach from Central Options Panel:
If you want to ‘Detach from Central’ prior to Archiving then tick the Checkbox which will enable the other options available under this panel.
Choose whether you want to ‘Preserve Worksets’ or ‘Discard Worksets’
- Date Format: select the required date format option to be used if using the Date Format Code option with Folder or File name above
- Invalid Characters: choose the required option to be used for replacing invalid characters from the drop down list.

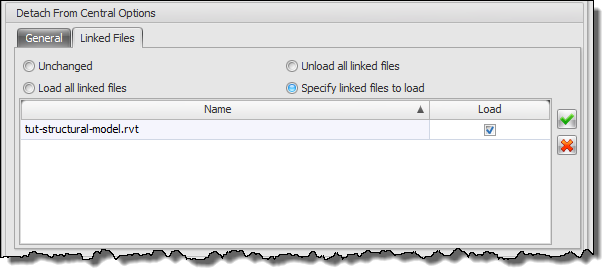
Linked Files Tab
When Detaching from Central for a project that contains Linked Files you can choose from the following options on the Linked Files Tab.
- Unchanged
- Unload all linked files
- Load all linked files
- Specify Linked files to load